I just think how to set up simple gateway server for a LAN. After searched for a while, i found some useful guide (see references).
Assume that your machine will be used as a gateway. This guide will be based on the figure below:
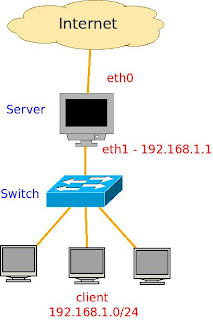 IP address Configuration
In this guide, IP address for each host in LAN need to be configured manually, unless DHCP server is installed.
DNS Server and Gateway
All hosts in LANneed to have same DNS server as your machine has and add the IP address of your machine as a gateway in LAN hosts, so that the IP packets will be route to the Internet through your machine.
Configuration of 'Gateway' machine
Step 1: Find DNS server on your machine
$ cat /etc/resolv.conf
The output will be like this
# Generated by NetworkManager
nameserver 10.1.2.21
nameserver 10.0.0.92
Step 2: Enable IP forwarding
First, check the default value. There are two ways.
Note: 0 means it is disabled
1. using sysctl command.
$ sysctl net.ipv4.ip_forward
net.ipv4.ip_forward = 0
2. cat the file /proc/sys/net/ipv4/ip_forward.
$ cat /proc/sys/net/ipv4/ip_forward
0
Second, change the value temporarily, so that, it will reset to 0 when you have shutting down the machine.
$ sudo sysctl -w net.ipv4.ip_forward=1
Try to check again to see the changed value.
To permanently enable the IP forwarding, you need to edit sysctl configuration file. Use any familiar text editor such as nano, vi and gedit.
$ sudo gedit /etc/sysctl.conf
Find these two lines, and uncomment the second line (remove the # symbol)
Before:
# Uncomment the next line to enable packet forwarding for IPv4
#net.ipv4.ip_forward=1
After:
# Uncomment the next line to enable packet forwarding for IPv4
net.ipv4.ip_forward=1
or simply edit using this command:
$ sudo sed -i 's/#net.ipv4.ip_forward/net.ipv4.ip_forward/g' /etc/sysctl.conf
Then update the change made.
$ sudo sysctl -p /etc/sysctl.conf
Step 3: Configure NAT on IP tables
iptables is very useful for maintain tables of IPv4 packet filtering in linux kernel. It has lots of chain rule. For performing NAT we have the command above (see manual for details):
$ sudo iptables -t nat -A POSTROUTING -s 192.168.1.0/24 -o eth0 -j MASQUERADE
-t nat, an option of IP table to perform NAT at each packet matching.
-A POSTROUTING. The –A is used for append chain rule of –t and we use POSTROUTING for altering packets as they are about to go out.
-s indicates as source address from where the IP packet can route through the NAT. it should be followed by IP address along with the netmask. In this command it shows and IP address of 192.168.1.0 with subnet mask 255.255.255.0, which need to be written as 192.168.1.0/24. This IP will be used in LAN from 192.168.1.1 - 192.168.1.254. Your machine can use 192.168.1.1 for eth0 interface. (Google IP and subnet mask tutorial)
-o is used for name of an interface via which a packet is going to be sent (POSTROUTING). In this example, we used eth0 since it is the only interface that can be connected to internet.
-j should be followed by target extension. In this option we choose MASQUERADE. This target is only valid in the NAT table, in the POSTROUTING chain. Masquerading is equivalent to specifying a mapping to the IP address of the interface the packet is going out.
Now, restart your network service (not necessary)
$ sudo /etc/init.d/networking restart
We are done configuring IP forwarding, NAT and gateway on your machines. The next step is configuring IP address on LAN hosts.
Configuration of Hosts in LAN
Enter IP address to the hosts in range 192.168.1.2 - 192.168.1.254.
in the gateway field, put the IP address of 'gateway' machine, which is 192.168.1.1
Then, restart the network for linux host. Note that the configuration will be the same for Windows hosts.
Done.
Check internet connection for the hosts in LAN
Hope this will help you. Enjoy!
References:


